
DIY Mission Control


The Do It Yourself (DIY) Mission Control project is designed to launch during the VIPER Mission, providing a public-facing application that delivers real-time telemetry updates from the mission. This platform will allow the general public to access live data and updates, leveraging the open-source mission control software known as Open MCT, to present mission data through various visual formats by utilizing a curated version of the mission database.
In this project, I served as the lead designer, creating the entire design process from start to finish. My responsibilities included conceptualizing the project, developing the narrative, crafting 2D and 3D graphics, and shaping the overall user experience. Once the designs were completed, I also served as a developer on the team, to develop some of the designs I had created.
I collaborated closely with stakeholders, such as NASA's Office of Communication (OCOMM), to discuss scope, ideas, and solutions, while also partnering with the development team to bring the designs to life. Additionally, I contributed to the development efforts, primarily working with Vue.js and HTML/CSS.
How did this project come about?
Open MCT is a crucial software tool used by mission operators in real-time to ensure the success of the VIPER mission. Recognizing its dual role as both a mission control software and an open-source platform, we explored how to leverage Open MCT from a marketing perspective.
Our challenge was to generate excitement for the mission in a way that stands out from any other NASA mission. Two key ideas emerged:
First, since Open MCT is integral to creating mission control displays for operators, we asked ourselves: Why not extend this experience to the public, making them feel like they're part of the mission by bringing these displays to them?
Second, taking it a step further, Open MCT’s open-source nature allows anyone with a computer to create their own displays. We saw an opportunity to let the public experience what it’s like to sit in the mission control room, designing their own displays with real mission telemetry.
With that, welcome to... Do It Yourself (DIY) Mission Control.
BACKGROUND.
USE CASE.
GLOBAL. As the goal of DIY Mission Control was to allow anybody from around the world to view live updates from VIPER, that was our main use case.
MOBILE. We also met with stakeholders and analyzed data from previous NASA missions; it showed that we would estimate anywhere from 50 to a couple thousand users daily. We further determined that a majority of our audience would be mobile users– as in, people viewing the application from their tablets or mobile devices.
PROFESSIONALS. As the project evolved, we discovered that VIPER personnel were highly interested in this initiative. The convenience of accessing mission updates through a simple website appealed to many, who indicated that they would use this application to stay informed, even when not working directly from the Mission Control Room.
This insight revealed multiple layers to our use cases. Beyond engaging the general public, who would be thrilled to see live images and telemetry from the moon, we recognized that renowned engineers, scientists, physicists, and other experts worldwide might also tune in. This realization underscored the need to design features that cater to users with a high level of expertise, ensuring the application meets the needs of all its diverse audiences.
DIY Mission Control is an application that leverages the data-driven capabilities of Open MCT to present complex, technical data from the VIPER mission. After identifying our use cases, the greatest challenge I faced was designing a user interface that could simultaneously captivate the general public from a marketing perspective and effectively present VIPER mission data in a manner that satisfies those with a deeper interest in the scientific and engineering aspects of the mission.
THE CHALLENGE.
GOAL.
In order to overcome this challenge, I had to break the problem down into several different aspects and tackle this problem from multiple perspectives.
Create an aesthetic for DIY Mission Control that is unique and captivating, while maintaining NASA's style pattern.
Design a user interface that is intuitive for general users, allowing them to spend more time exploring the various aspects of the mission rather than struggling to navigate the website. This approach ensures the audience can fully engage with and appreciate the mission's content.
Craft a storyline for the general public that simplifies learning about VIPER, ensuring the experience is engaging and informative without overwhelming them with excessive data.
Create a design that flows smoothly between desktop and mobile.
To help reach our first goal of creating a unique aesthetic, I spent a some time looking into fake UI examples. I pulled in interfaces from sci-fi TV shows, movies, video games, and more to help understand the underlying theme and aesthetic that I could create to captivate the audience.
I ended up creating a new theme plugin, called Darkmatter, for Open MCT that completely transforms the way that the UI would look for DIY Mission Control.
To learn more about what it took for me to develop this theme, check out my Darkmatter Theme page.
RESEARCH.
My second goal for DIY Mission Control was to design a user interface that is intuitive and user-friendly. Open MCT is a highly technical software with extensive capabilities, but one of the primary objectives of this application was to make VIPER accessible to the public. Given that much of the audience would be viewing data, I needed to find a way to redesign or enhance Open MCT’s capabilities, transforming the UI into a narrative experience that guides users through the mission's story.
To achieve my third goal of crafting the perfect storyline, I first needed to deeply understand VIPER’s story. Over the next few months, I fully immersed myself in the intricate details of the mission, engaging with various teams, including the Science Team, Operations Team, and the contractors responsible for building different parts of the rover.
Before starting this project, I thought I had a solid grasp of the mission, but I quickly realized how much more there was to learn. VIPER is a complex initiative, with numerous teams of exceptionally talented individuals, each contributing their specialized expertise to drive the mission forward.
Let me geek out to you for a second and give you a bit of high-level context about VIPER:

Volatiles Investigating Polar Exploration Rover (VIPER)
VIPER is a solar-powered rover that is being sent to the South Pole of the moon in search of ice and other key resources that may be essential to learning more about future human space exploration. It will be active for about 100 days, driving to areas near the South Pole that were pre-planned by mission operators.
CHALLENGES.
One of the main challenges of VIPER is the location of where it is landing. The South Pole has very harsh conditions– lack of sunlight, cold temperatures, and large craters. "Permanently shadowed areas" are abundant in this area of the moon, and are some of the coldest regions of the solar system. Being solar-powered, VIPER has to trek carefully, to ensure it is receiving enough sunlight to charge its batteries.

After extensively researching the mission, I began mapping out the optimal approach to effectively convey the VIPER story.
Over the next year, I engaged in multiple phases of ideation, including brainstorming, whiteboarding, wireframe development, and stakeholder consultations to review and refine the designs. I iterated on the project based on feedback, adjusting the scope and incorporating necessary changes.
Ultimately, I established the foundation on which DIY Mission Control was built.
STRUCTURE & LAYOUT.
After scoping the work with NASA stakeholders, we came up with a basic structure for how DIY Mission Control will be laid out. There will be two key parts: the wrapper website, and the Open MCT plugin.

Wrapper Website
-
NASA-official website that will be hosted on NASA's page
-
Main Menu and Navigation
-
Secondary Side Menu
-
Logo/Branding
-
Widget indicating current activity and the upcoming activity
Open MCT Plugin
-
Where the bulk of the design will reside
-
Each page of the Wrapper Website's main menu is a layout created in Open MCT
FEATURE #1:
Four Curated Layouts that each tell a unique story about VIPER.


Our very first, promising vision for DIY Mission Control. Each menu item at the top of the page represents another main layout.
The design process continued. More meetings with stakeholders, more designs, and more research to begin putting the pieces together for the curated layouts.
During this time, I began talking into more depth with some folks from the mission to have a better understanding of the types of mission telemetry we could expose to the public in real-time. Remember, this application is supposed to allow for the public to see the same data that mission operators are seeing, in exactly the same time. Obviously, there were some concerns regarding what data we wanted to keep private to the mission. These findings played a major part in my design process as well.
One of the biggest changes I had to make due to these discoveries was deleting an entire curated layout.
Originally, I planned to have four curated layouts that each told the story of the following parts of VIPER:
Driving
Drilling
Rover Operations
Science
However, multiple conversations with the Science team determined that our science discoveries were not something that we were willing to expose to the public.
So, I went back to the whiteboard to brainstorm what other storylines I could tell. I eventually finalized the four curated layouts, as well as their elements, that would tell the main stories.
DRIVING
-
Real-time imagery from the rover
-
Rover speed
-
Rover heading
-
Wheel steering and suspension angles
-
Rover current moon location
-
Sun angle
-
Battery %
DRILLING
-
Real-time imagery from the rover
-
Drill depth
-
Labelled drill diagram
-
Drill metrics (speed, temperature, current)
-
Drill temperature
-
Power States
-
Sun angle
-
Battery %
ROVER OPERATIONS
-
Visualizations of the rover and its different mechanics
-
Models and metrics of the science Instruments
-
Rover metrics (temperature, power states, current, etc)
-
Rover current moon location
-
Sun angle
-
Battery %
THE MISSION
-
Mission Plan
-
Current and upcoming activities
-
Countdown timers for future activities
-
Rover current moon location
-
Sun angle
-
Battery %
OTHER FEATURES
-
Current rover activity
-
Time into current activity
-
Time until next activity
-
Mission Day number
Build Your Own Display & Explore Telemetry
FEATURE #2:
This second feature was one of the primary inspirations behind the project and is the origin of the name "DIY Mission Control."
We were already leveraging a curated version of Open MCT—a display-building tool with fully developed capabilities that allows users to create their own displays using VIPER mission telemetry, which we make available to them.
Our vision was that when users access these features, they would be introduced to a more "vanilla" version of Open MCT—the original software. Ideally, this would be straightforward to develop, requiring minimal enhancements.
We envisioned the "Build Your Own Display" feature as a way to allow users to interact directly with the original Open MCT software, keeping them engaged and excited about the mission while also sparking their creativity.
The "Explore Telemetry" feature would present the mission telemetry (that we permit for public access) in its raw form, rather than through pre-built displays. This feature is designed for those in our audience who are eager to dive deeper into the mission, as well as for individuals who are already well-versed in science and engineering. It serves as a tool for further learning and exploration.
Ultimately, these features were developed to provide users with the full "Mission Control experience."


Initial wireframes for the Build Your Own Display and Explore Telemetry features.
GRAPHIC DESIGN PROCESS.
To effectively communicate the story of DIY Mission Control to a broad audience, I needed to design clear and engaging illustrations that would convey complex data in an accessible manner. A significant part of my role as Lead Designer for this project involved successfully conceptualizing and developing these visuals.
Before diving into the design process, I collaborated with experts on the VIPER team, who specialize in various aspects of the mission. By consulting with them and asking targeted questions, I gained a thorough understanding of the requirements needed to create these graphics successfully.
Below is some of the 2D and 3D graphics work that I developed for the project.
IMPORTANT NOTE: Many of the graphics I designed for DIY Mission Control caught the attention of VIPER Mission Operators, who then requested to integrate them into their mission displays for flight operations. This was incredibly exciting, as it meant that public users of DIY Mission Control could interact with real elements from the actual mission displays currently used in the Mission Operations Center.
2D GRAPHICS PRODUCTION.
These are a few examples of some 2D graphics I created. I mainly used Figma and Photoshop.
SUN ANGLE

This illustration highlights a critical storyline of the VIPER mission: managing the rover's reliance on solar power in an environment with limited sunlight. Given that VIPER is solar-powered, maintaining a charge is essential for its operation. To do so, the rover must be oriented towards the sun in a way that optimally charges its solar panels.
The rover not only needs to be in sunlight, but the angle at which sunlight strikes the panels is crucial for efficient battery charging. For instance, a 0° sun angle, where the sun is directly in front of the rover, is the least efficient—referred to as "OFF-SUN"—because no solar panels are positioned at the front of the rover. On the other hand, a sun angle of 225° (as depicted in the illustration) is ideal, as it maximizes exposure across the solar panels, thereby enhancing the charging rate.
This illustration not only provides a visual representation of the sun's position relative to the rover but also educates users on the optimal angles for solar charging efficiency.
WHEEL SUSPENSION
This graphic is designed to provide a real-time side view of the VIPER rover on the moon. A unique feature of VIPER is its "active wheel suspension," which allows each wheel to move not only up and down but also in and out, enabling the rover to navigate the moon's rocky terrain more effectively. Unlike a typical car, where all the wheels turn simultaneously in the same direction, each of VIPER's wheels operates independently.
As we receive telemetry data on the suspension of each wheel, the graphic will dynamically adjust to reflect the wheels' positions, which can vary between +/- 37 degrees.


WHEEL STEERING ANIMATION
Similarly to the Wheel Suspension graphic, this illustration demonstrates how the rover looks in real-time on the moon, but from the top-down view, with an emphasis on how the wheels are currently angled.
The cool thing about VIPER is that unlike a car, each wheel moves independently.As we receive telemetry data on the steer angle of each wheel, the graphic will dynamically adjust to turn the wheels' positions, which can vary between +/- 50 degrees.
ROVER POWER
This graphic provides a straightforward visual representation of the rover's current battery charge level.
As battery telemetry data is received from the rover, the graphic will automatically update in real-time, reflecting the charge level on a scale from 0% to 100%.

ROVER HEADING
This graphic provides as simple visual representation, of which direction the rover is headed in respect to North.
As the rover changes direction, the graphic will rotate, similar in motion to how a compass would.

ROVER TRAVERSE MAP
This illustration is an example of what a traverse path will look like for the mission. Mission Operators will use something similar to this– a pre-planned path with waypoints, key locations, and science stations scoped out– in order to know where to drive the rover during the mission.
While this is not the final path, we plan to receive the mission's traverse path before launch, simplify it for the public, update it onto the DIY Mission Control app.
This helps give users a bit more situational awareness of where the mission is in terms of completing the planned path, if they are at a Science Station preparing to perform science activities, driving, or more. Additionally, this brings a new level of excitement to the users, as this is something that real mission operators are using as well to perform the mission.
Lastly, the bottom left of the illustration showcases an image of the moon with location pinpoints of where previous Apollo Missions occurred, as well as a pin on where VIPER is. VIPER is a groundbreaking lunar mission, as it is landing and exploring the South Pole of the moon– something that has never been done by NASA before, and this illustration is a great way to call out the uniqueness of this mission.
3D GRAPHICS PRODUCTION.
These are a few examples of some 3D graphics I created using Blender.
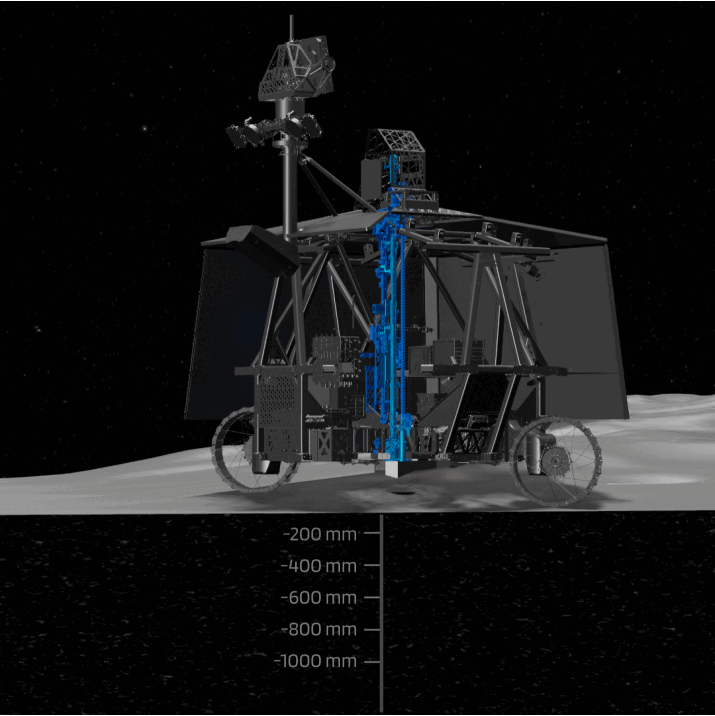
DRILL ANIMATION

One of the major design ideas I had for DIY Mission Control was to display a large model of the rover and the TRIDENT drill, when the rover was performing its drilling activity. With Open MCT's features, I figured that we may be able to animate the drill as well to visualize how far into the lunar surface the drill is in real-time.
Initial Vision


In order for me to start this project, I needed to get a 3D base model of the rover, as well as the drill.
Base CAD Models of VIPER
Upon receiving the model, I began studying the drill mechanics in detail with references provided to me by TRIDENT experts. My focus was on identifying the various components of the drill, understanding how the mechanisms interact to facilitate vertical movement, and analyzing the speed of operation for each part.
I then became familiar with Blender, a 3D modeling application, to begin my animation work. On the left is the first cut of the drill animation.
V1.0 of drill animation
.png)
V1.0 of Drill and Lunar Landscape
After reviewing the animation and confirming that it accurately depicted TRIDENT's movements, I proceeded to the next phase of the design: creating a realistic lunar landscape, applying colors to the rover, and refining the lighting.
I experimented with various textures and landscapes to craft a moon surface that included rocks and craters for added realism.
My goal was to make the TRIDENT drill stand out with a vibrant pop of color, so I chose dark shades for the rover and a bright blue for the drill.
Finally, I created a "fake sun" and adjusted the lighting to strike a balance between a realistic environment and a spotlight effect, ensuring that the scene maintained a visually compelling focus.
After that, I spent lots of iterations of edits and improvements to the lighting, shadows, landscape, and colors, and receiving feedback from TRIDENT experts.
FINAL PRODUCT.
This is the final product of this work, with a couple of screenshots of the drill in motion.
ROVER ON LUNAR BACKGROUND

Initial Vision
Another major design that I wanted to include into DIY Mission Control was an illustration of the VIPER rover on the moon as it was driving– I imaged it to be a major part of the Driving layout.
Alongside the graphic, I wanted to include different types of data, such as the rover's current velocity, which direction it is headed, and other various telemetry related to rover motion.
So, similarly to the previous design with the drill, I received a base CAD model of the rover, and I worked on creating a lunar landscape, used lighting and colors, to develop a semi-realstic image of the rover on the moon.


.png)
I did lots of experimentations with lighting, textures, textiles, surfaces, and more to figure out which method was the best way to create a semi-realistic lunar landscape and rover.
FINAL PRODUCT.
After multiple iterations of experimentations and getting feedback from others, I finalized the design. I wanted the lunar landscape to include some rocky hills in the background, as well as a couple of craters; this would best match how the lunar surface would look on the South Po I also created and stubbed in icons and 3D arrows that would he visualize the rover's different types of velocities as well (X, Y, and Yaw velocities).

OTHER EXAMPLE 3D GRAPHIC WORK
These are some other 3D graphics I created with Blender. My design vision was to include a page that focused on the different mechanics of the rover. To make the design more interesting, I wanted to incorporate graphics to help visualize how it looked, where it was located in the rover, and what they were called.
I was given the base CAD structure for the rover parts. Within Blender, I used colors, lighting, and different effects to call out the different mechanisms that I wanted to include in the final design for DIY Mission Control.
Examples
 |  |
|---|---|
 |  |
 |  |
 |  |
 |
DESIGN PROCESS.
After my vision for the designs began to become more clear, I went to work in terms of creating each of the four curated layouts for DIY Mission Control. To summarize my tasks during this part of the project, I had to do some of the following steps:
THE PROCESS.
-
Parse through the entire VIPER dictionary of telemetry points, and piece together interesting storylines.
-
Design basic wireframes of each layout of the general vision.
-
Present and demonstrate these wireframes and stories to different stakeholders of VIPER.
-
Gather and integrate the feedback, and comments into a polished design.
REPEAT.
MOBILE DESIGNS.
While I was creating the storylines for DIY Mission Control, I also began to draw out how the website would look on mobile. Previously, I had really only created designs for desktop, as my focus was primarily on setting up the foundation for the website.
However, as my designs became more clear, I was able to start envisioning DIY Mission Control on mobile, as well as using best well-known design practices that would make creating the same designs for desktop and mobile as easy as possible.


Initial Mobile Wireframes
For the next year, I continued to talk to stakeholders, reviewed and polished my designs such that I was able to meet my initial design goals with DIY Mission Control. By the end, I was able to successfully:
Tell the different stories of VIPER using mission telemetry in a way that is easy-to follow to the general public.
Create an aesthetic that is enticing and exciting for the audience, and maintain the theme throughout the entire design.
Design and create graphics that can make understanding VIPER's story easier.
Utilize and enhance Open MCT's UI such that it is intuitive to a new user, is catered toward browsing.
Create a design that will be appropriate for both mobile and desktop.
Design the workflow for Build Your Own Display on desktop.
FINAL DESIGN.
Here are some examples of the full design for DIY Mission Control: in both Desktop, and in Mobile.
LANDING PAGE & MENU
DRIVING
DRILLING
ROVER OPERATIONS
THE MISSION


CODE DEVELOPMENT.
Once the designs were finished and we had a clear idea of what this project is to become, we brought in the software development team to begin setting up the infrastructure, connecting to the Cloud, and working with mission personnel to be able to receive real-time telemetry flowing from their VIPER simulators as an initial starting point. The final plan is to connect the data to the real rover for the mission.
I collaborated with them to help turn these designs into a working prototype. Some development work that I did included:
Developed curated layouts using Vue.js to align with the designs. Collaborated with developers to create SVG graphics that dynamically animate in response to real-time telemetry data.